.jpg)


BA Public - Tournament Org.
Introduction
In this guide, we explained how players in a Tournament could use Bangolf Arena's public internet mode to register scores during a Tournament.
This would allow the possibility for scores to be registered immediately during a Tournament, this is one of the requirements if you would like to stream tournaments.
If you are a Tournament organiser and you would like your players to be able to register scores in this way, you must have Bangolf Arena running on a computer with a public IP address.
There are a few ways you could do this with a public IP address:
-
Having someone at their house running Bangolf Arena remotely. It should be relatively easy to acquire a public IP for your home internet (just contact your ISP and ask)
-
If you are just organising Tournaments in just one country, you should be able to find a 5G data only SIM card that can offer a public static IP. You may have to contact a few different providers. It won't be possible to activate roaming on these SIM cards however
In the case where the above two are not possible, you can run Bangolf Arena on the public internet on a computer in the Cloud. Then you would be able to access Bangolf Arena from anywhere with an internet connection.
This guide will explain how to run Bangolf Arena on a computer in the Cloud.
Please Note: The current guidance is that this method is to only be used when it is not possible to have a WiFi network that extends to entirely cover a course. Whenever possible Bangolf Arena Mobile Scoring should be used over WiFi.
1: Amazon Web Services (AWS)
Amazon Web Services (AWS) is a Cloud Platform. While there are others that you can use, this guide will walk-through the method using AWS. Deploying Bangolf Arena on AWS is free for a year, and AWS is relatively straightforward to use, which made it a good choice here.
2: Create AWS Account
Navigate to https://aws.amazon.com you can see here the free offers. For the purposes of Bangolf Arena, we will be making use of this one:

In the top right of the page select Create an AWS Account:

Enter your email address and create a username for your account:

You will receive a code via email (check your spam) enter this code on the next step:

Create a password. "Root user" here just means a type of admin account for your cloud computers

Enter your contact information.

Enter your payment information. Note that no payment is taken (and will not be taken for a year).
Verify your mobile phone number.

Finally, choose the Basic Support plan. This is the only one that is free.

3: Create Cloud Computer on AWS
In order to install Bangolf Arena you will need a computer in the Cloud. This computer will be created on AWS in this step.
First, log in to the Management Console using the account created during Step 2:

You will see a view that looks like the following picture. You must remember which region you are in. You can change regions, but you must remember it, because this is where you will find Bangolf Arena later:

Now, in the search bar, search for EC2. And under features select Dashboard.

Then, on the dashboard, select Launch Instance

Give the computer you will create in the Cloud (called an "instance") a name

In the Application search box, type Windows Server and hit Enter

Select the top result, Microsoft Windows Server 2022 Base

The Instance type should be automatically completely to the free instance

Select Create new key pair

Give the Key a name and select Create key pair. You will be prompted to save the key, Make sure you save it somewhere where you can find it later easily.

In the Network settings box, select Edit

At the bottom of the panel, select Add security group rule

Set the port range to 50432, the Source to 0.0.0.0/0 and give the rule a description

Finally, at the bottom right, select Launch instance

4: Access and prepare Computer
Navigate back to your EC2 dashboard. (Search EC2 in the search bar and select dashboard).
As long as you are in the correct region you should see that you now have one instance. Click on it:

Select the instance and click Connect

Select RDP client and then select Download remote desktop file and save it somewhere safe

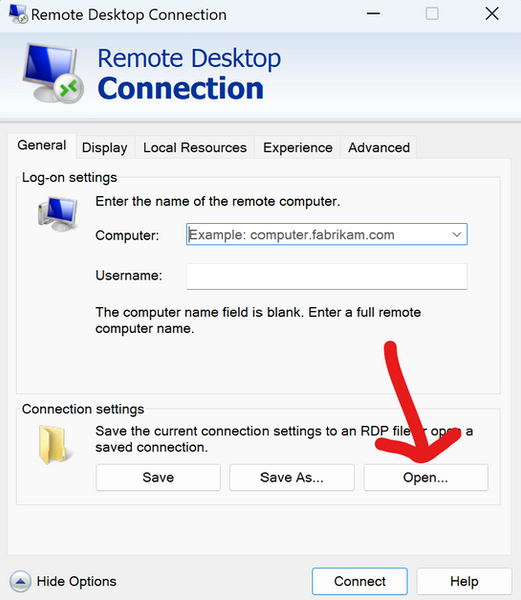
If you have a Windows PC use the start bar to find the program Remote Desktop Connection and launch it. On Mac use some equivalent software

Click Show Options and then open the file you just saved from AWS
Once the file is loaded, click Connect. Now, you need the password. Go back to AWS and click Get password.

Click Upload private key file and select the key you saved earlier. Then click Decrypt password

This will then give you the password, copy it from AWS, paste it in to the Remote Desktop software and you should have a connection to your cloud computer

On the Cloud Computer, use the Windows bar to open Windows Defender Firewall

Select Advanced settings

Select Inbound rules

Select New Rule..

Select Port

Select TCP and port 50432

Select Allow the connection. On the next page tick on the boxes. On the final page, give the rule a name.


You are now ready to install Bangolf Arena on the Cloud Computer.
5: Install Bangolf Arena
Launch the Internet application and navigate to https://www.isberginformation.com/eng/bangolfarena.htm
Then select Download Bangolf Arena

Follow the prompts to install Bangolf Arena

Then you can configure your Tournament in the normal way

Once your Tournament is configured, under BAMS tab select Verify access from public network

You should see this message which indicates players can now use BAMS over the public internet
